
Make New Crayons from Old, Broken Ones : )
Give them along with a valentine coloring page....

Recycled Toilet Paper Roll Vases... just wrap a toilet paper roll in festive paper, and give it a base with some extra cardboard. Voila!

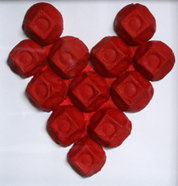
Egg Carton Heart Wall Hanging...
Just paint a piece of cardboard red(measure first using egg carton cups as a unit of measure) and glue on egg carton cups. When the glue's dry, paint everything red, and attach a pretty ribbon to hang!
These recycled crafts (c/o Kaboose.com are a great way to celebrate the holidays!)
These recycled crafts (c/o Kaboose.com are a great way to celebrate the holidays!)
Ribbon Spool Christmas Candle
By: Amanda Formaro
Difficulty: Hard
Age: 8 and up
Parental supervision is recommended
 Candles are wonderful, but this one is safer! This flame lasts forever and will not burn your fingers. It would make a lovely centerpiece on your Christmas dinner table.
;) Candles are wonderful, but this one is safer! This flame lasts forever and will not burn your fingers. It would make a lovely centerpiece on your Christmas dinner table.
Candles are wonderful, but this one is safer! This flame lasts forever and will not burn your fingers. It would make a lovely centerpiece on your Christmas dinner table. For more activities, be sure to visit our main Christmas page. Don't forget to check out our Christmas crafts, recipes, printables, games, clip art and coloring pages.
What you'll need:
- Large cardboard spool from ribbon
- Foam bowl (recommended: 12 oz polystyrene disposable food bowl)
- 1 sheet green felt
- Scraps of orange, red and yellow felt
- 12” long piece of 1-2” wide holiday ribbon
- 3 green skinny chenille stems
- White acrylic paint
- White craft glue
- Pen
- Scissors
- Large cardboard spool from ribbon
- Foam bowl (recommended: 12 oz polystyrene disposable food bowl)
- 1 sheet green felt
- Scraps of orange, red and yellow felt
- 12” long piece of 1-2” wide holiday ribbon
- 3 green skinny chenille stems
- White acrylic paint
- White craft glue
- Pen
- Scissors
How to make it:
- Paint the spool with white paint and set aside to dry.
- Cut green felt into twelve 2” square pieces.
- Cut chenille stems into fourths.
- Poke the center of a felt square with your finger or a pen, gather poked end and wrap a piece of chenille around it, forming a 3D leaf. Repeat for all twelve squares.
- Turn foam bowl upside down so the open side is faced down. Use a pen to poke a hole on the foam side of the bowl, about ½” down from the flat bottom. Insert the pointed end of the felt leaf into the hole. Poke the next hole about an inch from the first. Repeat this step until all twelve leaves have been inserted around the bowl. Trim the rim off the bowl so that the leaves are almost touching the table.
- Glue the spool to the flat bowl bottom.
- Cut a 2” tear drop shape from red felt.
- Cut a 1.5” tear drop shape from orange felt.
- Cut a 1” tear drop shape from yellow felt.
- Glue the yellow felt to the orange and the orange to the red so that each color shows behind the one in front of it. Add white glue to the bottom of the felt and the opening at the top of the spool. Insert the felt flame into the top of the spool.
- Tie ribbon into a bow and trim ends if needed. Glue to the front of your candle base, just above the leaves.
Tips:
- If you don’t have a ribbon spool, substitute with a cardboard tube from your paper towels. Cut out a round piece of cardboard from a shoe box or cereal box and glue it on top.
- Always save scraps of ribbon to use up in projects such as these.
- Felt is inexpensive, so stock up by picking up five sheets each time you shop!
Lightbulb Rudolph
By: Amanda FormaroDifficulty: Easy
Age: 7 and up
Parental supervision is recommended
;)
Decorate your whole home with festive Christmas crafts! Create homemade cards, your own Christmas ornaments, tasty Christmas recipes, or just snuggle up together with printable Christmas activities.
What you'll need:
- Burnt out lightbulb
- White vinegar
- Paintbrush
- Acrylic craft paint: brown, white, black and red
- 1 small jingle bell
- 6" thin gold ribbon
- 3 brown chenille stems
- 1 black chenille stem
- Black thin tip marker
- Red or silver glitter glue
- Hot glue gun
- Scissors
- Sealer spray
How to make it:
- Rinse the lightbulb with white vinegar and let dry.
- Paint lightbulb brown and let dry overnight.
- Paint lightbulb with a second coat and let dry for 2-3 hours.
- Put a dot of hot glue on the screw cap where it meets the glass of the lightbulb. Place the end of a brown chenille stem on the glue (see image). Wrap the chenille stem around the screw cap, gluing as you go.
- Before continuing with the second chenille stem (it will take two full chenille stems to cover the screw cap of a standard light bulb), bend the black chenille stem in half. Glue the open ends of the black chenille stem onto the brown twists you just added (to create the ornament hanger). Now continue with the second brown chenille, wrapping around the ends of the black chenille, covering them up (see image).
- Bend the third brown chenille stem into the shape of antlers (see image). Squeeze the bends so that the bends are touching each other (see image). Glue the antlers to the back of the chenille covered screw cap (see image).
- Dip thumb in red paint and gently press onto the large end of the bulb for the nose.
- Dip your pointing finger into white paint and dot on the eyes. Let the nose and eyes dry before continuing (see image).
- Meanwhile, thread the jingle bell onto the gold ribbon. When the bulb is dry, turn it over and glue the ribbon to the back of the bulb, you want the jingle bell to hang down just below the bottom of the bulb so that it appears your reindeer has on a collar (see image).
- Use the handle end of a paintbrush dipped in black paint to dot on the blacks of the eyes.
- Put a little silver glitter glue on your finger and smear it over the top of the red nose.
- When dry, spray the entire lightbulb with sealer spray and let dry by hanging somewhere safe.
Tips:
- Jingle bells are available at discount department stores and craft supply stores.
- Watch for sales on ribbon after every holiday.
- Save burnt out lightbulbs for these types of projects. If you save the packages they came in when new, mark the outside of the box "burnt out" and store them in there so they won't break.
Egg Carton Kinara
By: Amanda FormaroDifficulty: Very Easy
Age: 4 and up
Parental supervision is recommended
;)
Celebrate the season of Kwanzaa with this fun and easy to make kinara. The colors of the candles represent the people (black), their struggles (red), and the future (green).
What you'll need:
- Egg carton, you need 7 egg cups
- 7 jumbo craft sticks
- Yellow and orange construction paper
- Acrylic paint: green, red, black, and brown
- Glue
- Scissors
- Paint brush
- Hot glue gun
How to make it:
- Cut 12 place egg carton down the middle to create 2 lengths of six cups. Cut one of those lengths in half, creating 2 lengths of three cups each. Cut one egg cup from the other length of 6. You will need the 2 sets of 3 and the single cup, set aside the other cups for another project.
- Trim the egg cup edges with scissors to clean them up and so that it will stand evenly, cup opening pointed down. Hot glue the single egg cup between the two three piece egg cups to create one long 7 cup piece. Ask a grown up to use a pair of scissors to carefully poke a slit into the top of each egg cup.
- Paint the egg cups brown. Let dry.
- For the craft sticks, paint one black, three green and three red. Paint both sides and add another coat if you prefer. Let dry.
- Cut out simple flame shapes from yellow construction paper, large enough to fit at the top of each craft stick. Cut out smaller versions from orange construction paper. You will need 14 of each color.
- Glue the yellow flames to the tops of the craft stick candles, one on each side so that the project can be viewed on both sides. Glue the orange flames to the yellow flames.
- Insert the craft stick candles into the egg cup slits that someone helped create for you in step 2. The black candle goes in the middle, the red candles on one side and the green on the other.
Tips:
- For smaller children, instead of making the flames from two colors of construction paper, simply use yellow and let them draw on the orange part with crayons or markers.
- During each day of Kwanzaa, a new candle is lit. The first is the black candle, followed by the green and the red, alternating a different one each day. Insert your kinara candles as your parents light the real kinara.
- Craft foam is a great substitute for construction paper if you are running low.
Milk Carton Dreidel
By: Hailey BibackDifficulty: Easy
Age: 5 and up

What you'll need:
- 1 small, single size paper milk carton
- Masking tape
- Kitchen knife
- Acrylic paint
- 1 Popsicle stick
- Glitter pen or white craft glue and loose glitter
How to make it:
- Take a small, empty milk carton container and wash it out thoroughly. Dry it gently using a kitchen towel.
- Close the spout on the container and tape it shut using a small piece of masking tape.
- Using a kitchen knife (parents, please do this part for your children) cut a small incision into the bottom centre of your container, just long enough to put a Popsicle stick through.
- Paint the entire milk carton whatever colour you choose. If the paint looks streaky, do another coat.
- Wait an hour to make sure the paint is completely dry and then add the letters Nun, Hay, Gimel and Shin (pictured below) with glitter pens or craft glue and loose glitter to the four sides of your dreidel, one letter on each side.

Tips:
- How to play the Dreidel game: This game should be played in groups of four. Each player gets an equal amount of gelt. (In Yiddish, gelt means money or gold. You can use pennies, candy or nuts). Put another amount of gelt in the pot. Then, each player takes a turn spinning the top. If it lands on Nun, the player receives nothing. If it lands on Hay, the player takes half of what’s in the pot. If it lands on Gimel, the player takes all of the pot, and if it lands on Shin, the player puts one piece of gelt into the pot.
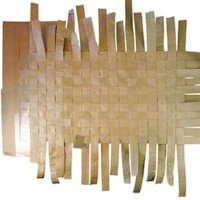
Paper Bag Placemats....
(c/o freekidscrafts.com)

Use a weaving technique, a recycled paper bag and eco-friendly craft products to make an attractive and earth-friendly place mat. All the products used to create this charming place mat are eco friendly. The tacky Green Glue is completely botanical. Even the paints contain no or low VOC’s (volatile organic compounds).
Supplies
Brown Paper Grocery Bag
Eco Green Crafts™ Green Glue™
Eco Green Crafts™ Acrylic Paint
Eco Green Crafts™ Gloss Medium
Click here for printables, patterns and Templates
InstructionsMake Strips
1.Deconstruct paper bag.
2.Measure and cut 2-inch-wide strips along the entire length of the bag.
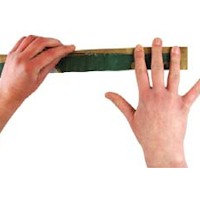
3.Working with one strip at a time,dampen the strip with water to remove any creases. Fold down 1⁄4" along one edge of the length of strip, as shown.
4.Fold the opposite side so that it just overlaps the edge of the previous fold, as shown.
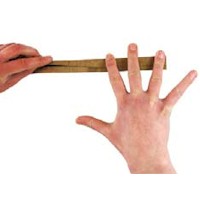
5.With the iron set on high, iron the strips to dry and flatten them, and to strengthen the creases.
6.Apply a thin line of Green Glue™ along the 1⁄4" edge.
7.Turn strip over (folded side down); iron strip smooth.
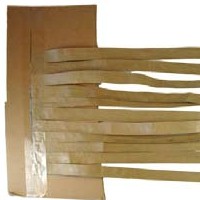
8.Repeat process to create a total of eleven 24" strips and seventeen 18" strips.
Weave and Finish
9.With tape, affix the 24” strips to a piece of cardboard as shown.
10.Weave shorter strips through longer strips, alternating each strip, as shown; affix each strip with Green Glue™ and allow to dry.
11.Remove the cardboard and tape; cut the ends of each strip to about ¾”.
12.Paint as desired with Eco Green Crafts™ Acrylic Paint; allow to dry.
13.Brush entire surface with Eco Green Crafts Gloss Medium; allow to dry.
14.Roughen / distress the surface of the mat with sandpaper as desired
This project was designed by Julia Andrus of Eco Green Craftsand is reprinted courtesy of FaveCrafts.com.

Clay Pot Pilgram's Hat....
This craft (c/o about.com) is pretty self explanatory~ simply paint a clay pot black- acrylic works best- a little white ribbon, and some yellow felt for the buckle, and you're good! Attached with Tacky Glue OR glue gun (if you're gluing as opposed to your little ones)....
A Recycled ThanksgivingBy Ellen Luckett Baker
(c/o alphamom.com)
This Thanksgiving we’ll be serving up a heaping helping of gratitude. Though the historical meaning of Thanksgiving is a little murky, giving thanks is always a good exercise for children. In these lean times, simple is better. So here are a couple of recycled crafts to get children involved in the Thanksgiving festivities.
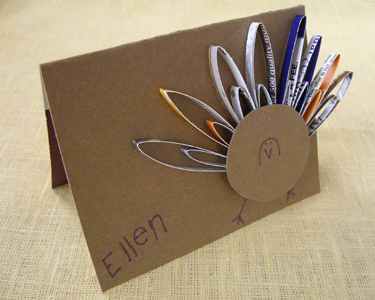
Turkey Place Cards
From planning the menu to setting the table, children enjoy being part of the process. Our five-year-old loves to talk about what should be served and can practice her writing skills by creating a menu. Young kids can also help out in the kitchen. By giving them manageable tasks like tearing the lettuce, pouring the ingredients, stirring, or cutting mushrooms with a butter knife, they will enjoy cooking with you. Folding napkins in a new way helps build their motor skills while keeping them busy. Children can also help decide the seating arrangement and make place cards.
These Thanksgiving recycled place cards are fun to make and will add a personal touch to the table.
Supplies:
Directions:
1. Cut cereal boxes to 5″x 8″. You’ll need one for each place card, so you can get about two cards from each box.
2. Score the printed side of the box in the middle. Fold over and put under a heavy book to press flat.
3. Cut card stock mailers in 1/4″ strips.
4. Fold down about 1 1/2″, wrap around and fold again. Glue in place. Continue until you have all the “feathers” made. You’ll need 6-8 feathers for each card.
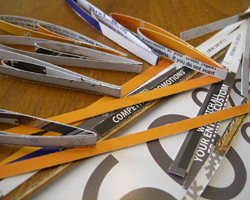
5. Glue feathers together and allow to dry.
6. While you’re waiting for the glue to dry, go ahead and have your child write the names on each card.
7. Fan out the feathers. Dip the feather group in a pan of glue and place off-center on the card.
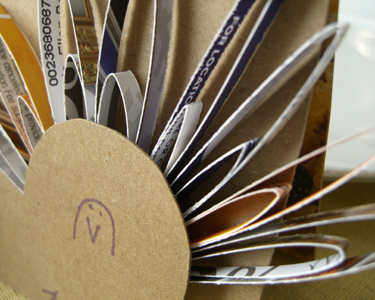
8. For the turkey body, cut 2″ circles from the cereal boxes. Have your child draw a turkey head and face on each circle.
9. Glue bodies on top of the feathers. Have your child draw some turkey legs.
10. Add one to each place setting.
These crafts, c/o (who else) kaboose.com are clever ways to use items from around the house and from nature~ to make crafts that give that fall-feeling you can only get in the northeast!
These crafts, c/o (who else) kaboose.com are clever ways to use items from around the house and from nature~ to make crafts that give that fall-feeling you can only get in the northeast!
Leafy Door Hanger
By: Amanda Formaro
Difficulty: Easy
Age: 5 & up
Parental supervision is recommended
;)
Celebrate the return of fall right from your front door. Kids will love putting this craft together by getting their hands dirty with finger painting.
You can also get some extra millage out of the materials of this craft by using scraps to create the Patchwork Acorn craft.
Discover other great activities for autumn in our main Fall Crafts section.
What you'll need:
- 1 large piece of art paper or 2 sheets of white construction paper
- Acrylic craft paint in fall colors such as red, orange, brown, yellow, gold and green
- Scissors
- 15" twig or branch
- 4- 15" lengths of jewelry cord
- White craft glue
- Football-shaped cookie cutter (optional)
- 1 large piece of art paper or 2 sheets of white construction paper
- Acrylic craft paint in fall colors such as red, orange, brown, yellow, gold and green
- Scissors
- 15" twig or branch
- 4- 15" lengths of jewelry cord
- White craft glue
- Football-shaped cookie cutter (optional)
How to make it:
- Using a paper plate or paint palette, squeeze out about a quarter-size dollop of each color of paint.
- Finger paint the entire piece of art paper with the different colors. Let children be creative, just guide them if they start to blend colors too much as you can end up with a brownish gray color. Let the paint dry completely (see image).
- When the paint has dried, turn the paper over and do the same thing on the other side. Let dry.
- When paint has dried, use a football-shaped cookie cutter to draw out as many shapes as you can on the painted paper. If you don’t have a cookie cutter, draw out simple leaf shapes (see image).
- Cut out the leaf shapes and set the scraps aside to use for another project.
- Set a bug-free branch on the work surface. (See the tips section for methods of ridding branches from bugs.) Line up three pieces of the jewelry cord, evenly spaced from each other, along the stick.
- Glue the leaves onto the cord, placing one under the cord, and then overlapping a second leaf over the first leaf and the cord. Repeat until all three cords have leaves (see image).
- Tie the top end of the cords to the stick. Secure with some white craft glue (see image).
- Tie the remaining piece of jewelry cord to both ends of the stick to create the hanger. Secure knots with some glue. Let glue dry.
- Trim the excess cord ends.
Tips:
- Save the reserved scraps of painted paper for another project. These would be perfect for a mosaic craft.
- Rid twigs of bugs by soaking them in a combination of water and bleach. Fill a bathtub up half way and pour in 2 cups of bleach. Make sure to turn the twigs so all sides are soaked. After 24 hours, transfer the twigs into a large clean plastic bucket and soak in cold water for an additional 24 hours. Let dry completely before using.
- White craft glue is best and safest, but hot glue can be used to attach the cord to the sticks and will adhere faster.
Coffee Can Scarecrow
By: Amanda Formaro
Difficulty: Easy
Age: 7 and up
;)
This adorable scarecrow made from a coffee can is the perfect decoration for your fall party table!
Fall is full of fun for the kids. Try out more of our fall crafts, as well as some of our great fall recipes and printable activities.
What you'll need:
- Coffee can
- 2 sheets tan felt
- Small scrap of orange felt
- 2 large mismatched buttons
- 18" twine
- Scissors
- White craft glue
- Instant grab glue
- Raffia
- Small straw hat
- 2 silk flowers
- Coffee can
- 2 sheets tan felt
- Small scrap of orange felt
- 2 large mismatched buttons
- 18" twine
- Scissors
- White craft glue
- Instant grab glue
- Raffia
- Small straw hat
- 2 silk flowers
How to make it:
- Put lid on coffee can. Cover coffee can with tan felt using white craft glue. (See photo.)
- Place coffee can on its side and use instant grab glue to pipe on the mouth. Cut twine to fit on the glue smile and press in place. Cut remaining twine into one inch pieces. Use instant grab glue to attach to the smile in a stitch type fashion. (See photo.)
- To make the nose, cut a triangle from orange felt and use instant grab glue to attach it just above the smile.
- Use instant grab glue to attach two buttons for eyes.
- Stand coffee can up and pipe a generous amount of white craft glue onto the coffee can lid. Cut raffia into 18" lengths and place on top of lid, covering the lid (be sure the raffia lines up properly with the facial features!). Let dry. (See photo.)
- Glue the hat onto the raffia hair.
- Glue two silk flowers to the hat. (See photo.)
Tips:
- Many coffee companies are moving using plastic containers. You can still use these plastic containers to create this craft, or scale down the size and use a vegetable can instead.
- If you prefer a more cutesy face, use wiggle eyes instead of buttons.
- Yarn can be used instead of twine for the smile.
Acorn Frame
By: Amanda FormaroDifficulty: Very Easy
Age: 5 and up

Acorns are a sure sign of autumn. Gather the kids together to make this adorable frame to hold one of your family's favorite fall snapshots.
Fall is full of fun for the kids. Try out more of our fall crafts, as well as some of our great fall recipes and printable activities.
What you'll need:
- Acorn tops, enough to cover your frame, we used 59
- White craft glue
- Wooden frame
How to make it:
- Gather acorn tops that have fallen from the trees. Place acorn tops in a bowl of water to soak. Use a toothbrush and a little baking soda to clean them off if you wish. Rinse, drain, and pat dry with a towel.
- Place the acorn tops on a cookie sheet and have an adult bake them in a preheated 225 degree F oven for about 40 minutes. This should kill any remaining insects that may be hiding and will also dry the acorn tops. Remove from oven and let cool on a paper plate in a single layer. (See photo.)
- Apple a generous amount of glue to one section of the frame at a time. Cover with acorn tops, hanging the ends of the acorns over the edges of the frame if needed to fit. (See photo.)
- Once the frame is completely covered, fill in all the gaps between the acorns with craft glue. Let dry overnight. (See photo.)
Tips:
- If you want a more colorful frame, paint the acorns.
- To jazz up your frame, add a bow to a painted frame or use jute, twine or raffia to add a bow to a natural frame.
- When collecting acorn tops, be sure to gather extras to save for additional projects!
;)
;)
;)


;)
;)
;)
;)
;)
;)

;)

- Rate this craft
- Rated by 3 members
Get kids excited about Passover before the Seder with these fun-to-make Kiddush Cups.
- Materials
- Cotton swabs
- Small paintbrush
- White craft glue
- Multicolored craft gems
- Small plastic wineglass
- Mod-podge craft glue
- Multicolored tissue paper
- Instructions
- Use a small cotton swab to apply a small amount of glue to the back of each gem.
- Arrange and attach them around the outside of the wineglass and on the pedestal.
- Let the jewels dry.
- Tips:
- Be careful to place the jewels and strips of multicolored paper well below the rim.
- Variations:
- For a "stained glass" Kiddush cup, cut multicolored tissue paper into small pieces. Start at the outside midsection of the glass and glue on the pieces of the tissue paper, working down the stem toward the bottom of the glass. Completely cover the lower half of the glass with tissue paper. Use a paintbrush to cover the entire tissue-papered area with Mod-Podge and let it dry.
Cardboard Tube Moses
By: Amanda Formaro
Difficulty: Average
Age: 8 and up
;)
This fun craft project is perfect for Sunday school or for celebrating Passover. Teach children the story of Moses and have fun while creating this cute figure from recycled materials like the tubes from toilet paper or paper towels.
Be sure to check out all our Passover crafts as well as our main Passover index for even more fun activities including coloring pages and holiday recipes.
What you'll need:
- Cardboard tube
- Brown and peach felt
- 2- 3” x 2” scraps of cardboard
- Acrylic paint in peach and pink
- White doll hair or yarn
- Brown chenille stem
- 4-5 cotton balls
- Black marker
- Scissors
- White craft glue
- Paintbrush
How to make it:
- Paint the top portion of the cardboard tube peach. No need to paint the back or anywhere else as the rest will be covered with felt. Use a cotton swab or your fingertip to pick up some pink paint. Blot most of it off with paper towel so that it's almost dry. Dot on the cheeks.
- Glue doll hair or white yarn around the peach area (face). Glue on for hair and beard.
- From a sheet of brown felt, cut a large half circle.
- Insert cotton balls inside the cardboard tube. There should be enough that they will provide roundness for the top of the head, but not too many that the tube cannot stand on its own. Glue inside to secure.
- Wrap the brown felt around the tube, starting at the top and back of the head and wrapping around both sides, meeting in the front. Trim if needed to fit and glue in place.
- Trim cardboard rectangles to give them rounded top edges. Glue one behind the other, allowing it to be shown from the back. Use black marker to write some of the commandments on the front tablet (i.e. thou shalt not steal, honor thy mother and father, etc)
- Glue tablets to the left side of the robe.
- Bend the top of brown chenille stem into a cane shape. Glue to the other side of the robe.
- Cut out two small circles from peach felt. Glue one on to the chenille cane (hands) and the other to the left side of the tablets.
- Use black marker to add dots for eyes and draw on eyebrows.
Tips:
- The word Passover refers to the exemption of Israelites from the death of their first born. Homes that were marked with lamb’s blood (indicating Jews) were “passed over” when the wrath was brought down.
- Save cardboard tube from toilet tissue rolls and paper towels for craft projects such as these.
- White yarn and doll hair are both available from your local craft supply store.


Roundup: Using Old T-Shirts
27 FEBRUARY 2010 11,651 VIEWS 11 COMMENTS
by heatherHere are some REALLY cool ideas of what to do with old t-shirts from a website called dollarstorecrafts.com. T-shirt Yarn tutorial to follow!
by heather
Here are some REALLY cool ideas of what to do with old t-shirts from a website called dollarstorecrafts.com. T-shirt Yarn tutorial to follow!
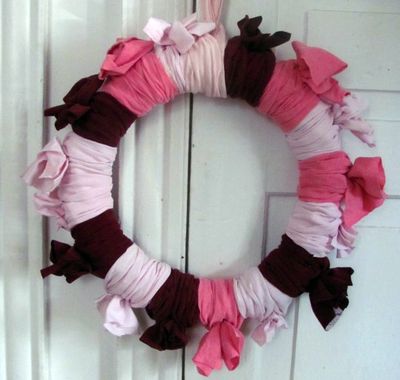
Old T-Shirt Wreath
Don't you just love the idea of using your old shirts to make pretty decor? Take color-coordinated shirts and transform them into a wreath. Use a grapevine wreath or wreath form, and old clothes, and you'll only spend a buck! Get the tutorial details at Scoutie Girl.
 Make an Asymmetrical T-shirt Skirt
My friend Lee from Leethal is an amazing crafter with tons of great ideas, and she does a lot of great work with recycled materials. Check out her tutorial for an asymmetrical t-shirt skirt here.
 Make an Unusual T-shirt Quilt
You've seen the standard all-squares t-shirt quilts (which are awesome, don't get me wrong), but this strip-quilted t-shirt quilt is a genuine masterpiece. If you're not into the other kind, this one is an amazing choice. Calls for about 20 t-shirts and tutorial is by Erika Kern at CraftStylish. Part One Here and Part Two Here.
 Make a T-shirt Pillow
Use your favorite old t-shirt to make these cute throw pillows, and stashbust some fabric while you're at it. Tutorial at Maiden Jane (via TT).
 Make a T-shirt Scarf
 No-Sew Ribbon Altered T-shirt
No sewing required in this cute tutorial from Living Locurto.
 Make a T-shirt Shrug
Cute way to alter an old t-shirt into a new shrug! By Something Shiny
Projects to make with your t-shirt yarn:
 Wheelchair or Walker Tote Bag
 Knitted Dishcloths
 Unique Half-Circle Bathmat
 Braided Scarf
 T-shirt Necklace
Celebrate Black History Month

Black History Month celebrates contributions made by African Americans and people of African descent around the world. It was started by an African American man named Dr. Carter G. Woodson in 1926. Back then, it was celebrated the second week of February. Now it is celebrated for the whole month of February in the United States and Canada, and the month of October in the United Kingdom.
Why was Black History Month started?
Dr. Woodson studied African American culture and encouraged other people to study it, too. He felt it was important for people to recognize the great contributions black people have made. He devoted his life to educating people as a teacher, a writer, and a publisher. He was also a political activist who worked to make sure the government treated African Americans fairly.
Negro History Week was set for the second week in February to celebrate the birthdays of two people who worked hard for African Americans: Abraham Lincoln, the white president who freed the slaves, and Frederick Douglass, the first African American Vice Presidential nominee.
Negro History Week became Black History Month in 1976, in celebration of our nation's 200th birthday.
Ways to Celebrate Black History Month:
No matter what your background, everyone can celebrate the importance of Black History Month. Celebrate the achievements and inventions of the black people featured in this article by reading about them below. Which important figures below contributed something that means a lot to you? Find a way to commemorate those achievements that affect your everyday life, whether it's through art, film, literature, music, education, civil rights, sports or even food!
For more information and ideas on black history month go to: http://www.kaboose.com/
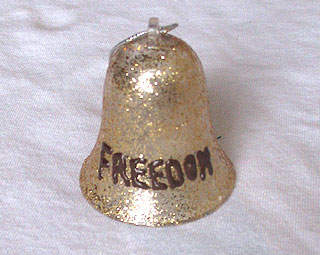
Let Freedom RING!
The Liberty Bell, and its replica the Freedom Bell, are symbolic of independence and equality--two ideals that Martin Luther King Jr. fought to achieve for all men and women.
Make this glittering Freedom Bell craft for kids to teach them even more about some of the beliefs Dr. King felt were especially important.
What you'll need:
* Solo Cup/Empty Yogurt Container
* Gold Glitter
* School Glue
* Brown or black 3-D (puffy) paint
* Paintbrush
* Black marker
How to make it:
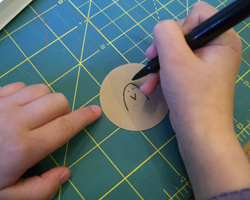
1. Use the black marker to write the word “FREEDOM” on the front of the bell shaped cap, down toward the bottom.
2. Paint a layer of glue all over the bell. Roll bell in plate full of glitter until covered. Allow it to dry completely and repeat for a second coat. Let dry again.
3. Use the 3-D paint to write the word “FREEDOM” on the bell. Use you’re the word you wrote in marker as a guide. Let dry completely.
What do peanut butter, the gas mask, and the Super Soaker have in common? They were all dreamed up by black inventors. Here are some famous inventions by African-Americans:
George Washington Carver
(1860–1943)
George Washington Carver changed lunchtime sandwiches forever when he invented peanut butter. Born a slave, Carver didn’t attend college until he was 30 years old, but he went on to create 400 new uses for peanuts, soybeans, sweet potatoes, and pecans. These new discoveries transformed the southern United States from a one-crop region of cotton into multi-crop farmlands, providing farmers with hundreds of profitable uses for their land.

Peanut Butter Birdfeeders
You'll need a toilet paper roll, bird seed, and a lot of peanut butter.
Cover toilet paper roll with a thick layer of peanut butter, and roll around in bird seed (some people also use pine cones tied to fishing line). The toilet paper roll will fit nicely on a branch now that there are no leaves!
Garrett Morgan
(1877-1963)
Both of Garrett Morgan’s inventions—the gas mask and traffic signal—help save lives. Many soldiers survived the First World War thanks to the gas mask, which prevented deadly mustard gas from entering the lungs. Today, our roads are orderly and less dangerous thanks to traffic lights that come from Morgan’s original idea. Morgan came up with the
idea for a traffic light after witnessing an accident involving a horse-drawn buggy and a car.

Graham Cracker Traffic Light
You'll Need:
- a popcicle stick
- graham cracker
- chocolate icing
- original m&m's (not holiday, etc)
To Make:
- Ice one side of the graham cracker with frosting, and stick on the red, yellow, and green m&m's
- Put a little icing on the tip of a popcicle stick, and stick the graham cracker to the stick
- Enjoy!
Recycled Crafts: Presidents Day
Pretzel LogCabin
;)
;)
Every year, we make gingerbread houses by frosting a small milk carton, and sticking on graham crackers and candies. This follows that same idea. It could not be easier! Little ones can do everything from spreading the frosting/peanut butter to sticking the pretzels on the house.
What You'll Need:
- Small empty milk carton (washed and dried)
- Pretzel sticks
- Chocolate frosting or peanut butter
- 1 Rolo or other tubular shaped candy
- graham cracker for the door
How to make it:
How to make it:
- Frost the top flap first (to be the roof-peak), and cover with pretzels.
- Spread chocolate frosting or peanut butter on one side of milk carton then cover with pretzels. Repeat this step all over the milk carton until log cabin is complete. You may need to break the tips off of some of the pretzels to make then fit up the sides.
- Break a graham cracker to be a suitable sized door. Spread some frosting or peanut butter on the back of the first half. “Glue” it to the front of the cabin as the door. Repeat this step with a smaller broken piece for the window.
- Spread some frosting or peanut butter to the bottom of Rolo and stick to the roof as a chimney.

This is a great craft for two reasons: it familiarizes kids with the presidents, and it opens discussion for the value of money. My 4 year old recently told me that if you have 4 quarters, you have 4 cents. This craft is perfect!
Supplies Needed:
Paper Plates (4)
Printable President Silhouettes:
Lincoln: http://kidscraftzone.com/file.axd?file=Lincoln+Silhouette.pdf Jefferson: http://kidscraftzone.com/file.axd?file=Jefferson+Silhouette.pdf
Roosevelt: http://kidscraftzone.com/file.axd?file=Jefferson+Silhouette.pdf
Washington: http://kidscraftzone.com/file.axd?file=washington+silhouette+.pdf
Paint, Crayons or Markers (Silver and Brown)
Scissors
Glue
- Paint one plate brown, and the other 3 silver
- Print/cut out the presidents' silhouettes
- Glue silhouettes to paper plates (make sure Lincoln goes on the brown one)
- On the back of the plate, I had my little ones look at the back of the appropriate coins, and draw what they saw on the actual coins(the Lincoln Memorial was interesting)
Additional US Coin Information:
- Penny -1¢ Front of Coin: Abraham Lincoln-16th U.S. President Back of Coin: The Lincoln Memorial
- Nickel- 5¢ Front of Coin: Thomas Jefferson-3rd U.S. Back of Coin: President Monticello -Jefferson's home
- Dime- 10¢ Front of Coin: Franklin Delano Roosevelt- 32nd U.S. President Back of Coin: Olive Branch,Torch,Oak Branch.
- On the back of a Roosevelt dime, the center torch signifies liberty. The oak branch to the right signifies strength and independence. The olive branch to the left signifies peace.
- Quarter-25¢ Front of Coin: George Washington-1st U.S. President Back of Coin: American Bald Eagle

"Yes We Can" Can
This craft is inspired by Barack Obama's famous 2008 presidential campaign phrase, "Yes we can." It's an excellent way to start your little one on the value of saving money, and giving. Before starting this craft, take a minute to talk about saving money that might go to a local charity. Explain the organization (in kid-talk) how it's right to help others.
What you'll need:
- Empty vegetable can
- 1 sheet of white construction paper
- ½ sheet of red felt
- 1-2 white pipe cleaners
- Red and blue paint, markers, or crayons
- colored glitter pens
- White craft glue
- Scissors
How to make it:
- Measure the width of the can and cut out a strip of construction paper that will cover the entire width of the can.
- Write the phrase "Yes We Can" across the piece of construction paper in outlined letters so that your little one can color them in.
- Your child can decorate the rest of the paper using paint, markers, and glitter.
- Trace round bottom of can on to a piece of scrap paper.Cut out the circle you just traced on the scrap paper to use as a template.
- Place it on to the felt. Either hold it in place with your fingers or use a safety pin to attach it. Use scissors to cut around the circle, leaving a 1.5” border. You should now have a large felt circle.
- Fold the felt circle in half. Using the scissors, cut a slit in the middle. Open up the half circle.
- Place the felt circle on top of the can and secure with the pipe cleaner, wrapping a couple of times to tighten. Do not glue!When glitter glue on the paper is dry, glue the “Yes We Can” band around the can.
- Find this and other Presidents Day crafts at http://holidays.kaboose.com/presidents-day/presidents-day.html

Paper Plate Obama Symbol
In honor of Presidents Day, make the Obama symbol from the 2008 campaign. This is a good opportunity to talk about the voting and how Americans elect their president.
What you'll need:
- Paper plate (we used a 9" plate)
- Red and blue acrylic paint
- Paintbrush
- Pattern http://crafts.kaboose.com/obama.pdf
How to make it:
- Print out Obama "O" pattern to the appropriate size.
- Draw pattern onto paper plate lightly in pencil.
- The center of the plate remains white.
- Paint the upper border of the plate with blue paint according to the pattern.
- Paint the three stripes red.Allow to dry completely.
Recycled Crafts: Valentine's Day
As the little ones head in to school to fill their Valentine Mailboxes, look around the house to see what you can make into a homemade token of little love!

The Toilet Paper Roll-Love Bug is simple. Just paint a toilet paper roll in a soft color, and add construction paper butterfly wings with glue! The best part for my kids was to bend and twist the antennae and glue on "googly eyes". You can find this and more at: http://www.planetpals.com/recycle_holiday_crafts.html
The next recycled Valentine's craft comes from: http://scrumdillydo.blogspot.com. It's the Valentine's Memory Game!

All you need is cardboard (they suggest using a cereal box), scrap book paper or old wrapping paper, and mod-podge.
- Cover one side of the cereal box in one (uniform) type of wrapping/scrap paper.
- Cut the covered card board into an even number of hearts (use a template to ensure the size is the same).
- Cover every 2 hearts in the same pattern wrapping/scrap paper.
- Allow to dry, and play Valentine's Memory!
The last suggestion is to simply take old clothes, and cut into patterns to make Stuffed Valentine's Hearts!

All you need is some old clothing (tee shirts work great!), stuffing, fabric paint, buttons, yarn, "googly"eyes, or anything else that would look cute as a face. You can either sew the heart together, use fabric glue or hot glue.
This is from: www.inhabitots.com
<